
Question: How do I set up a DKIM record in Google Workspace?
Explanation: DKIM (DomainKeys Identified Mail) is an authentication method that proves emails sent from your domain genuinely originate from your organisation and have not been altered in transit. It protects your domain against spammers, spoofing and phishing attacks, and improves email deliverability because receiving mail servers (such as Gmail, Outlook and Yahoo) treat your messages as trustworthy. Think of DKIM as a digital seal that verifies every email.
- Private key – Stored securely at Google and used to digitally sign every outgoing email. This key never leaves Google's servers.
- Public key – Published by you as a TXT record in your domain's DNS so receiving mail servers can verify the signature.
- SPF (Sender Policy Framework) – Defines which servers are allowed to send email on behalf of your domain. A receiving server checks whether the sending IP appears in your SPF record.
- DKIM (DomainKeys Identified Mail) – Verifies the integrity and origin of an email through a digital signature. Unlike SPF, DKIM remains valid even when an email is forwarded, because the signature is tied to the content itself.
- DMARC (Domain-based Message Authentication, Reporting & Conformance) – Tells receiving servers what to do when SPF or DKIM fails (reject, quarantine or allow) and sends reports back to the domain owner.
Solution:
Then navigate to:
- Select the domain you want to generate a DKIM key for from the dropdown. Do you have multiple domains under Google Workspace? You'll need to repeat this procedure per domain — each domain requires its own DKIM key pair.
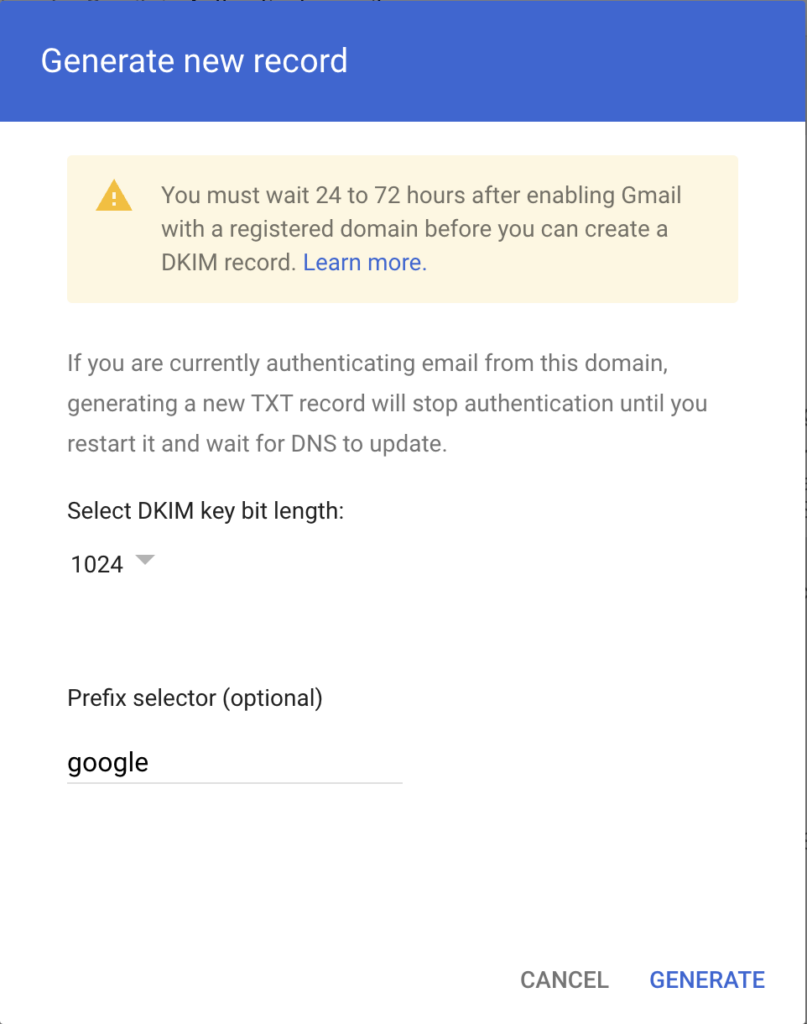
- Click 'Generate new record'.
- Choose the desired prefix (the so-called selector, default 'google'). You can also pick a custom value such as
. This is useful if you want to rotate the key later without immediately removing the old one.google2026 - Select the desired key length: [list]
- 2048-bit (recommended) — more secure and the current standard.
- 1024-bit — only use this when your DNS provider doesn't support long TXT records.
v=DKIM1; k=rsa; p=...Go to your domain provider's website — the party where you registered the domain name, for example TransIP, Cloudflare, GoDaddy, Namecheap or Google Domains. Find the DNS settings or DNS management section for the relevant domain.
Then add a new TXT record with the following values:
| Field | Value |
|---|---|
| Type | TXT |
| Name/Host | google._domainkey |
| Value | The copied TXT record value |
| TTL | Default (usually 3600 seconds) |
google._domainkey.yourdomain.com.yourdomain.comgoogle._domainkeyIn practice the record is usually visible within 15 minutes to a few hours. You can verify the record was published correctly using:
- MXToolbox DKIM Lookup — enter your domain and selector.
- Google Admin Toolbox Dig — choose TXT as the type and look up
.google._domainkey.yourdomain.com
Only proceed to the next step once both tools return the public key.
- Select the domain you added the DKIM record for in DNS.
- Click 'Start authentication' to enable DKIM for the chosen domain.
Once activated, Google automatically signs every outgoing email from this domain with DKIM. The status in the panel changes from 'Not started' to 'Authenticating email'.
DKIM:
